The system.xml is a configuration file that is used to create configuration fields in Magento 2 System Configuration.
In this blog we will cover the step-by-step guide to set up System Configuration in Magento 2.
Simple Module to Show the Working of System Configuration
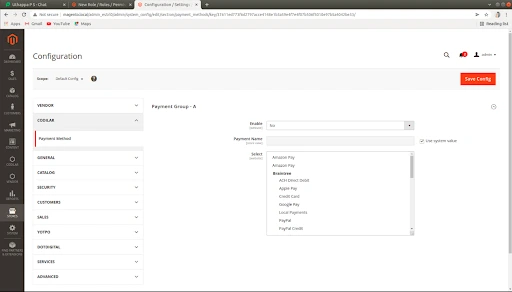
The below example shows you the configuration to enable the payment groups and set the required payment type and give them a label and select payment from the list:
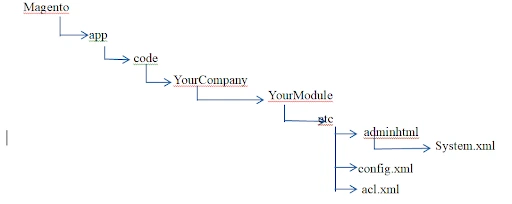
So, let us get familiar with the folder structure
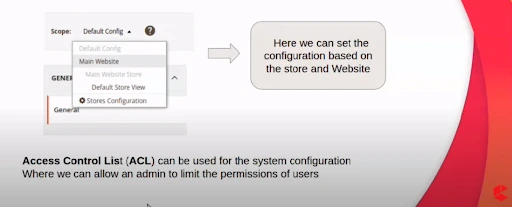
So now let’s start with ACL
Access Control List (ACL)
Sometimes we need to restrict access to certain features of our module / Extension, or even maybe entire module based on the rule of owner/admin for different users.
We can do this by the one the power feature in MAGENTO2 called Access Control List (ACL).
Each and every user role in Magento backend may have different permissions and Access Control based on admin rule
How to create ACL
To create an ACL we need to follow the below step
Step 1: Create resources as required
Create a acl.xml file in:
app/code/CompanyName/ ModuleName/etc/.
The below code add the required resource tree.
Our File:
app/code/Codilar/Checkout/etc/acl.xml
<?xml version="1.0"?>
<config xmlns:xsi="http://www.w3.org/2001/XMLSchema-instance" xsi:noNamespaceSchemaLocation="urn:magento:framework:Acl/etc/acl.xsd">
   <acl>
       <resources>
           <resource id="Magento_Backend::admin">
              <!-- this resource id we can use in system.xml for section -->
              <resource id="Codilar_Checkout::config" title="Payment Groups" sortOrder="1"  />
           </resource>
       </resources>
   </acl>
</config>
Our resource will be placed as a child of Magento_Backend::admin. Each resource will have an ID, Title, and SortOrder attribute:
Where:-
- Id: Specifies unique string under which menu has to be created.
It will be in the form of
“CompanyName_ModuleName::resourceName” (as above we have used “Codilar_Checkout::config” ) - Title: In Title, we specify what name have to be displayed on the menu bar (as above we have used Payment Groups)
- SortOrder: Position in which menu is displayed when you have multiple resources or menus.
Step 2: After creating the file clean the cache using “bin/Magento cache:clean“ and see the result in the resource tree in the admin panel
Step 3: Check ACL
- Go to the Magento backend
- Navigate to System | Permissions | User Roles from the main navigation menu.
- Click on the Add New Role button or access an existing role
- As shown in the following screenshot, you will get the page where you can see the resource which you added

One of the places where we use the ACL to limit access when required is System configuration i.e system.xml.
The below code shows the ACL resource used in system.xml.
”Codilar_Checkout::config”
<section id="payment_methods" translate="label" sortOrder="15" showInDefault="1" showInWebsite="1" showInStore="1">
   <class>separator-top</class>
   <label>Payment Method</label>
   <tab>codilar</tab>
   <resource>Codilar_Checkout::config</resource>
   <group id="group_a" translate="label" sortOrder="20" showInDefault="1" showInWebsite="1">
So let’s Continue with System.xml now
System.xml
system.xml file that is used to specify configuration options in the Magento backend, which end users can in turn use to configure the module functionality. We can go to Store -> Setting -> Configuration to check how it looks.
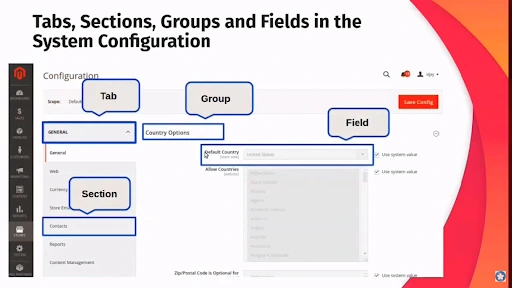
The above image represents the System configuration where it is divided into :
Tab | Section | Group | Field, and in the field we have the different options (like text area, label, input, multi-selector, etc)
This configured data will be saved in MAGENTO 2 database configuration file as core config data.
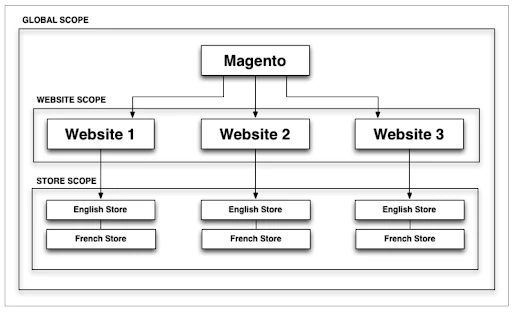
Basically, Configuration options in Magento can store values on three scopes
- Global: As the name implies, this applies across all scopes.
- Website: These are defined by a domain name and are composed of
one or more stores. Websites can be set up to share customer data or be
completely isolated. - Store: These are used to manage products and categories and to group store
views. Stores also have a root category that allows us to have separated
catalogs per store.
->Store view: By using store views, we can set up multiple languages on our
store frontend.
The below Image represents the same
So keeping this in mind to create a system.xml we need to follow below step’s
Step 1: Create System.xml
Create a system.xml file in app/code/CompanyName/ModuleName/etc/adminhtml/ Directory.
Now let’s create a new configuration tab for Codilar (Name as you require) and a new Section for our module Checkout(ModuleName), a Group to contain some simple fields: enable module, text, and multi-selector.
Our File: app/code/Codilar/Checkout/etc/adminhtml/system.xml
<?xml version="1.0"?>
<config xmlns:xsi="http://www.w3.org/2001/XMLSchema-instance" xsi:noNamespaceSchemaLocation="urn:magento:module:Magento_Config:etc/system_file.xsd">
   <system>
       <tab id="codilar" translate="label" sortOrder="10">
           <label>Codilar</label>
       </tab>
       <section id="payment_methods" translate="label" sortOrder="15" showInDefault="1" showInWebsite="1" showInStore="1">
           <class>separator-top</class>
           <label>Payment Method</label>
           <tab>codilar</tab>
           <resource>Codilar_Checkout::config</resource>
           <group id="group_a" translate="label" sortOrder="20" showInDefault="1" showInWebsite="1">

               <label> Payment Group - A </label>

               <field id="is_active" translate="label comment" type="select" sortOrder="25" showInDefault="1"  showInWebsite="1">
                   <label>Enable</label>
                   <source_model>Magento\Config\Model\Config\Source\Yesno</source_model>
               </field>

               <field id="payment_name" translate="label" type="text" sortOrder="30" showInDefault="1" showInStore="1" canRestore="1">
                   <label>Payment Name</label>
                   <depends>
                       <field id="*/*/is_active">1</field>
                   </depends>
               </field>

               <field id="allowed_methods" translate="label" type="multiselect" sortOrder="40" showInDefault="1" showInWebsite="1">
                   <label>Select</label>
                   <depends>
                       <field id="*/*/is_active">1</field>
                   </depends>
                   <source_model>Magento\Payment\Model\Config\Source\Allmethods</source_model>
               </field>

           </group>
       </section>
   </system>
</config>
- Tab: We can have many sections and some main attributes and child attributes inside the tab.
- ID: The ID attribute we use to identify our configuration section. Inside this node, we will specify all the fields and groups for the configuration section.
- SortOrder: This attribute specifies the position of the Tab, group, or a section
- Translate: This attribute will let Magento know which title has to be translated
- Label: This child element is the text which will show as tab title.
- Section: In this element will have ID, SortOrder, Translate attributes as same as Tab element. Some other attributes (ShowInDefault, ShowInWebsite, ShowInStore) as we had seen in above fig:1.4 will decide this element will be shown on each scope or not. You can change the scope here
And also we can have as many groups and other child elements as required
- Class: This value will be added as the class name, we use it when we need to style or make up the elements.
- Label: Text title of session element,
- Tab: Hear we specify tab id which we used before. This tab element will let Magento this session belong to a given tab id and a section will be placed under that tab
- Resource: this is an ACL rule the admin user must have in order to access this configuration. (as we created in beginning “Codilar_Checkout::config” )
- Group: Here we may have many fields and few attributes which are the same as Section
- Fields: it plays an important role in the page. It will take the input and save the given setting data. In this, we focus on the type attributes which define how elements will be while displaying. It can be text, select, file,multi-select, etc. With each type, we will define the child element for the field to make it work as we want.
- With the type select/multi-select you must define the child element source_model.
- In the above example, we have used a two-source model
- <source_model>Magento\Config\Model\Config\Source\Yesno
</source_model>
Which provide yes or no option - <source_model>Magento\Payment\Model\Config\Source\Allmethods</source_model>
Which provide all payment method avilable in store
- <source_model>Magento\Config\Model\Config\Source\Yesno
Step 2: After creating the file clean the cache using “bin/magento ca:cl“
Step 3: Check Configuration
- Go to the Magento backend.
- Navigate to Store -> Setting -> Configuration.
- You will find your tab.
Set default value (config.xml):
The config.xml is responsible for providing the default value to the system.xml as creating it will have a null value, but it is not mandatory we can say it is based on the requirement.
So for the above-written system.xml we need to set the default value for the fields without going to configuration, set data, and save it.
Step 1: Create config.xml
Lets Create a system.xml file in app/code/CompanyName/ModuleName/etc/ Directory.
Our File: app/code/Codilar/Checkout/etc/config.xml
<?xml version="1.0"?>
<config xmlns:xsi="http://www.w3.org/2001/XMLSchema-instance" xsi:noNamespaceSchemaLocation="urn:magento:module:Magento_Store:etc/config.xsd">
   <default>
       <payment_methods>
           <group_a>
               <is_active>1</is_active>
               <payment_name>Pay Later</payment_name>
           </group_a>
       </payment_methods>
   </default>
</config>
Which is as below structure:
<default>
   <section>
       <group>
           <field>{value}</field>
       </group>
   </section>
</default>
Step 2: After creating the file clean the cache using “bin/magent ca:cl“
Step 3: Check Configuration
- Go to the Magento backend.
- Navigate to Store -> Setting -> Configuration.
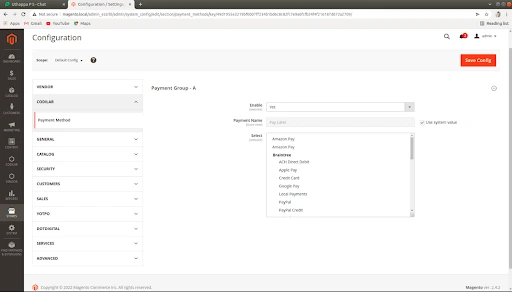
- You will find your tab and default value. The below image represent the same
For the store view Structer is :
 <stores>
   <store_code>
       <section>
           <group>
               <field>{value}</field>
           </group>
       </section>
   </store_code>
</stores>
For the website view Structer is:
 <websites>
   <website_code>
       <section>
           <group>
               <field>{value}</field>
           </group>
       </section>
   </website_code>
</websites>
Final Output
If you want to take your Magento 2 module to the next level by creating a Progressive Web App (PWA), then you should definitely check out this article “Progressive Web App: A Complete Guide for 2023” .
If you have any further questions, checkout our Video Tutorial on System Configuration on Magento 2.
Do let us know in the comment section below about what you want our next Magento tutorial blog to be about.
